C++ Project Generation
There are multiple ways to get custom C++ code into EZ. The best way is to create an engine plugin, because this way the code can be executed directly inside the editor. Additionally such plugins can be hot reloaded to some degree.
EZ uses CMake for its build infrastructure. See this chapter about different ways to integrate your own project into the EZ build.
The most convenient way, however, is to let the editor create a stand-alone project for you. This way you get a CMake based project that only contains your code, but has all the necessary references set up to link against EZ and output its DLLs to the right folder.
Note:
One downside with this approach is that your C++ IDE will not contain the EZ engine sources. That makes it less convenient to search for existing functionality, look up code API docs and stepping through EZ code while debugging. However, if you want that, you can include the generated plugin as an external project into the EZ build system.
Video: How to add custom C++ code to your game
How to Generate a New C++ Project
Note:
Generating C++ projects requires a one time setup. Go to the preferences Tools > Preferences... and configure the C++ compiler to use for your C++ projects. See Editor Settings for details.
Select Project > C++ Project > Setup C++ Plugin.... The following dialog will appear:
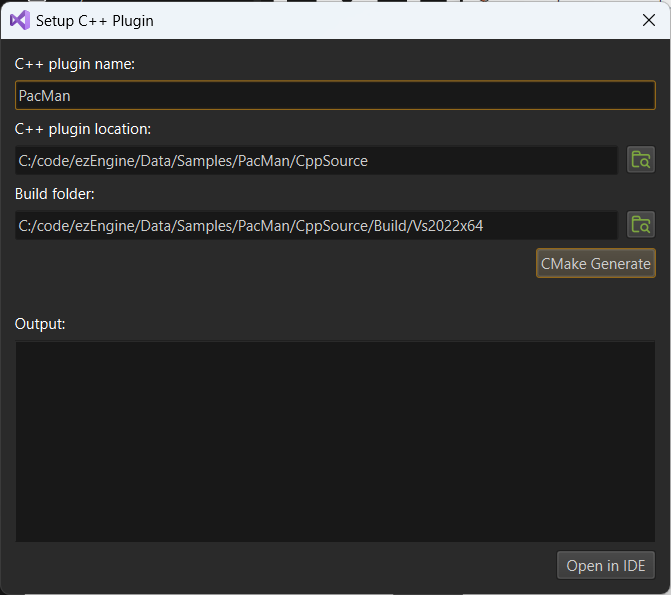
Currently the locations for where the C++ source is stored and where the project will be built are both hard-coded to be within the project directory.
Choose the desired name for the plugin or leave the default.
Press the CMake Generate button and wait for it to finish.
The CMake output is written into the Output window. In case of errors, please have a look here.
If everything went fine, you can open the project and compile the code.
Attention:
The code has to be built for the very same build type that the editor is running in (Debug, Dev or Shipping), otherwise the editor won't be able to load the DLL. If the build fails because certain EZ DLLs are missing, you are most likely building the wrong build type. The same may be true if you do code changes, but running the game from the editor doesn't reflect those changes. The editor makes sure to generate the solution only for the necessary build type and will update the solution automatically when needed.
Opening an Existing C++ Project
If you have generated a C++ project before, the Open in IDE button will be active right away when you open this dialog. In this case you don't need to generate the C++ project again. You can also skip this dialog and use Project > C++ Project > Open in IDE instead.
Regenerating a C++ Project
If you have added or removed source files on disk, you might need to regenerate the C++ project for those changes to show up in your IDE. You have three options to do so:
- Use Project > C++ Project > Regenerate C++ Project.
- Run CMake yourself. For example you can use the CMake GUI app, point it to the plugin's build directory, and then Configure and Generate the C++ project at any time you like.
- Rerun CMake Generate from the dialog above. This will clear the CMake cache and fully regenerate the C++ project. Be aware that this resets all CMake options to their default values and often takes longer than strictly necessary.
What Gets Generated
The generated solution contains two projects.
- An engine plugin with some sample code for custom components and a game state. You are supposed to implement all your game logic in here.
- A custom application that is similar to ezPlayer. This will automatically load the engine plugin and run the game logic. This is only meant to be changed to modify the integration into the host operating system. It also gives you an
.exefile that you can distribute.