Visual Script Class Asset
The Visual Script Class asset enables you to define custom logic for components and state machines using a visual programming language. Its intended use is to bridge the gap between what other components provide. For example a trigger component provides an event when something enters an area, and a spawn component can spawn a prefab, however, to have a creature spawn in a room when the player enters it, you need something that connects the two. Visual scripts are a great way to accomplish this.
Visual Script Editor
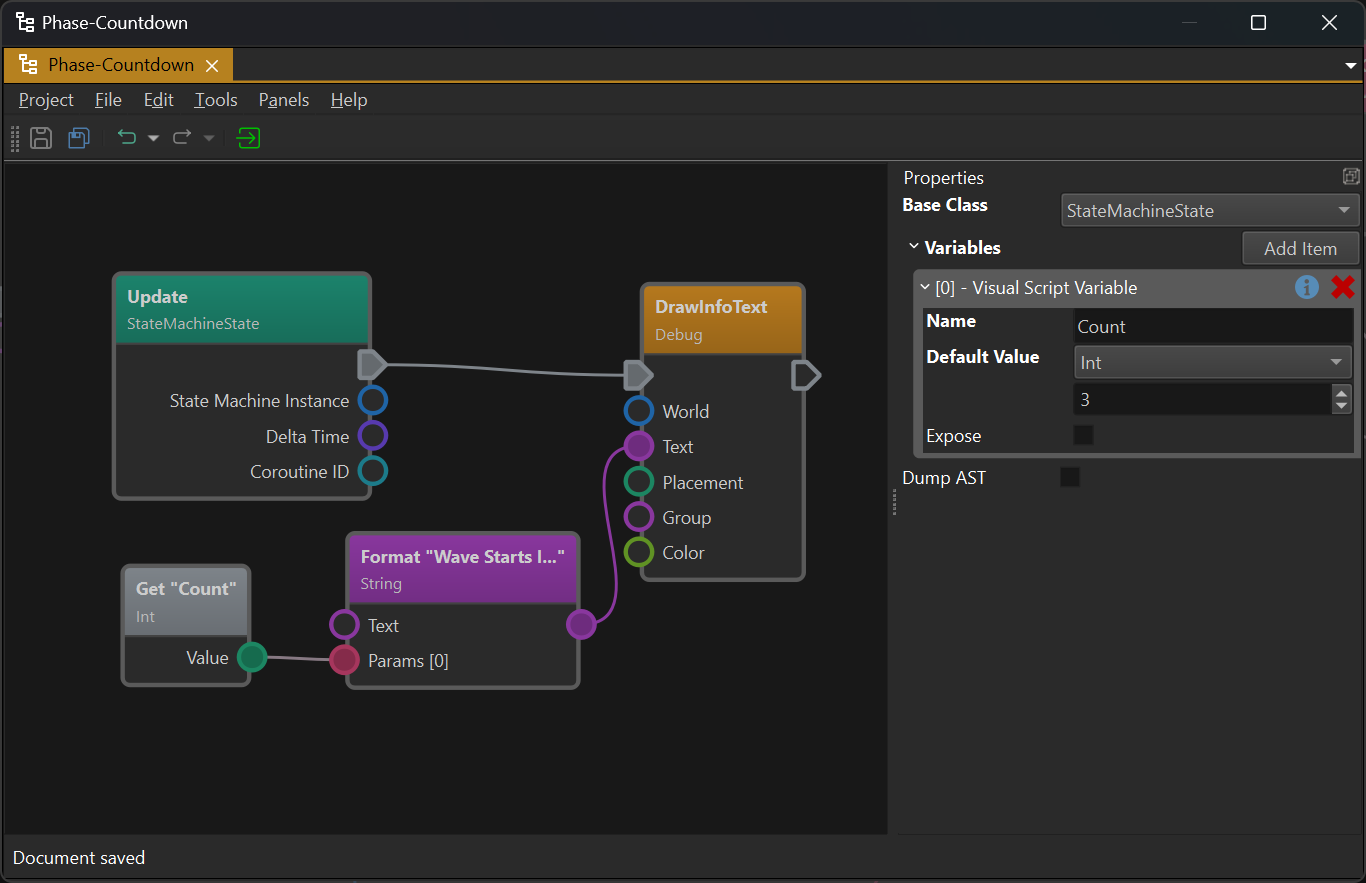
The image above shows the visual script editor layout. On the left is the graph editor where you can add and connect nodes. Right-click and drag to pan the view. Use the mouse wheel to zoom.
On the right is the property panel which shows the properties of the selected node. Node connections cannot be selected and don't have properties.
When nothing is selected, as in this case, the general script properties are displayed.
Script Base Class
Deselect all nodes to see the script properties. The Base Class property defines in which scenario the script may be used.
Base Class: Component
When Component is selected as the base class, the script acts like a component. Component specific functions like Component::GetScriptOwner() are only available with this base class.
These scripts are used in conjunction with the script component to execute them.
Base Class: State Machine State
When StateMachineState is selected as the base class, the script acts like a custom state for a state machine. In this case, different functions are available, such as StateMachineState::GetScriptOwner().
These scripts are used in state machines through the script state.
Visual Script Variables
Through the general script properties you can add variables to your script. These may just be internal variables to keep track of state, but when the Expose flag is enabled, they become exposed parameters. These variables will show up where the script is used (for example on script components) and allow you to pass in different starting values.
Variable Types
Variables support various data types including numbers, strings, and vectors. The available vector types are Vec2, Vec3, and Vec4. Additionally, you can create:
Array Variables: Set the variable category to Array to create a typed array. On the component side, arrays are displayed with their element type for better readability. Note that internally within visual scripts, arrays store variants and are not strictly typed.
GameObject and Component References: Internal (non-exposed) variables can store references to game objects and components. This is useful for caching the results of expensive lookups at runtime. Note that GameObject references cannot currently be exposed as public variables.
Numeric Variable Options
For exposed numeric variables (Int, Float, etc.), additional options are available:
ClampRange: Enable this to restrict the value to a specific range.MinValue,MaxValue: When clamping is enabled, these define the allowed range. Values are automatically clamped on the component side.
Editing Visual Scripts
To build a visual script, right-click into the graph editor to open the context menu:
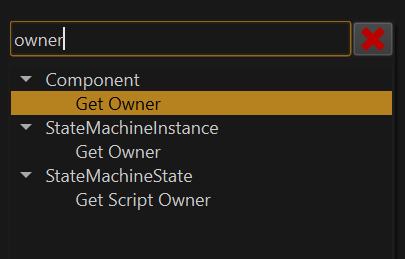
The menu shows all the available nodes that can be added. Type into the menu's header to search for specific items.
Nodes have pins on the left or right side with which they can be connected. The flow of execution and data goes from left to right. You connect pins via drag and drop. Every pin has a color-coded type. Not all pin types are compatible. Once you start dragging from a pin, all incompatible pins are greyed out and connections snap towards compatible pins. Depending on the target pin type, a data conversion may happen. For example, if a number pin is connected with a string pin, the number will be converted to text.
Nodes
When you select a node, you will see its properties on the right.
When a node has input pins (pins on the left), it often also has properties for those pins. This is used for setting an input to a constant value, rather than passing it in through the pin. So when an input pin is unconnected, the script will use the value from the property grid.
Some nodes have additional configuration properties, that cannot be passed in through a pin, for example GameObject::TryGetComponentOfBaseType() where you have to select the desired base type.
Execution Pins
Execution pins are the grey, arrow-shaped pins at the top of nodes. Not all nodes have them. These pins define the order in which nodes are executed. Only very few nodes have only an outgoing execution pin. These are entry points for the script, meaning they are where script execution starts. For instance, in the image at the top, the Update node is an entry point. Whenever the script gets updated (usually once every frame), this node gets executed. After that, the node that is connected to it through an execution pin gets executed. This continue until the last node in a chain was executed.
Some nodes have multiple outgoing execution pins, such as the Switch nodes. These nodes are used to conditionally execute one or another code path.
When a node has an incoming execution pin, it must be connected to something, otherwise the node can never be executed. However, nodes that do not have execution pins, at all, are executed on demand whenever their output is needed by another node that is being executed.
Data Pins
All the round pins are data pins meaning they represent some kind of data. Many different types of data are supported. Numbers are generally convertible into other number types, and nearly everything can be converted to the string type, but most other types mostly exist to be passed unmodified from one node to another.
Coroutines
The flow of execution starts at an entry point node and follows the execution pins to the right until the last node is reached. Usually this will happen within on script update and thus all nodes along the path are executed within the same game tick.
Coroutines allow you to pause execution at any point in the graph, and have the script continue there at a later time. Consequently, a script may have multiple threads of execution, meaning that there might be several execution paths active over a longer period of time.
Have a look at this script:
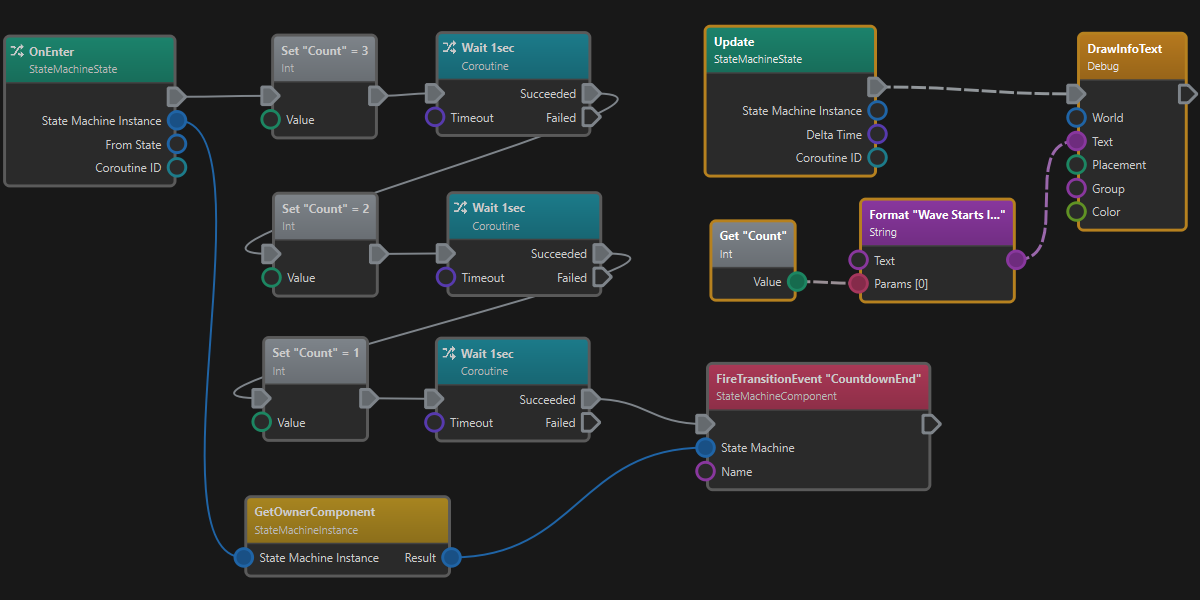
There are two entry points, the OnEnter node and the Update node. OnEnter is only executed once when the state machine state got activated. However, Update is executed once every game tick (every frame).
The OnEnter code path uses the Wait function. This turns the entire execution path into a coroutine. What this means is that when Wait is encountered, this execution path pauses for a second. After the wait is over, it continues from that point until it runs into the next Wait call.
Tip:
When an execution path uses coroutine functionality and thus may execute over a longer duration, the entry point node of that path shows an extra icon of two crossing arrows in its top left corner. See the
OnEnternode in the image above and compare it to theUpdatenode, which is not a coroutine.
In the mean time, the Update node is executed every frame. Thus when it runs, you already have two threads of execution, the one starting in the Update node which finishes right away, and the one that started from the OnEnter which is dormant for a time, but continues after a while.
Coroutines are a powerful and very convenient feature, as they make it possible to write code in a very linear fashion, even though there are complex, temporal dependencies.
A common use case for coroutines is to sequence AI tasks or quest objectives. For example one may instruct an NPC to walk to a position and then sit down. The command to walk somewhere is given through a node. But then an AI system has to calculate a path and steer the creature around obstacles to make it reach that point. None of this is part of the visual script, instead the walkTo node would be a coroutine node that pauses the script until the task is fulfilled or failed. On success the script would then run the next node to play the sit down animation. So the script is very simple, even though walking to a spot is a very complex operation.
Coroutine Modes
When an entry point node gets executed that already spawn a thread of execution before, and that thread is not yet finished, there are three different ways to continue.
Stop Other: In this case, the existing coroutine gets canceled without notice. Use this mode when you always only want to react to the latest update. For example, you may have a coroutine that moves a creature to a picked location when the player clicks somewhere. Once the player clicks somewhere else, you would want the creature only to walk to the new target, and want to cancel the previous coroutine.
Don't Create New: In this mode you let an existing coroutine fully finish before starting a new one. For example a door would react to a button press by fully opening or closing and only react to another button press when the first action is over.
Allow Overlap: In this mode every single event would spawn a new coroutine, which all execute in parallel. For example a timer may fire once a second and every time you want to react to this by doing something complex, then you would use this mode to react to all events equally.
The coroutine mode is selectable on every entry point node.
Advanced Coroutine Features
Every entry point provides a coroutine ID. This can be used to cancel a specific coroutine if needed. Similarly, there are functions to stop all coroutines or start separate ones. You can also use the Yield node to interrupt a script at a specific point and have it continue in the next frame.
Loops and Arrays
You can execute loops to iterate over data or repeat certain actions. Several different loop nodes are available. They all operate in the same way, that they have two outgoing execution pins. One execution pin is for the loop body. This execution path will be executed repeatedly until the loop is finished. Finally, the completed execution pin is executed to continue with the code that comes after the loop.
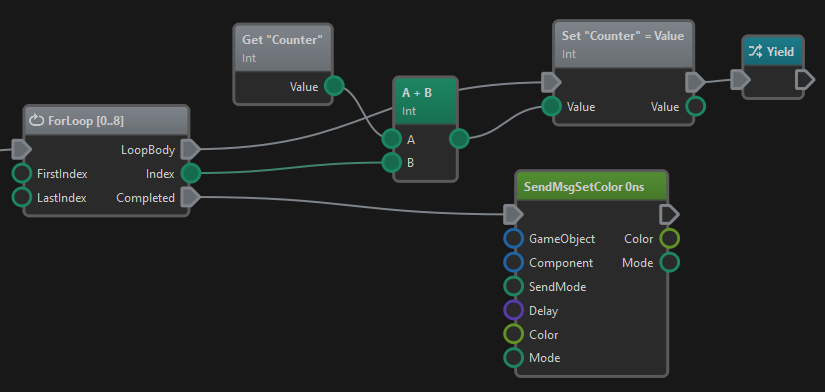
For example, the following script loops from 0 to 8 (inclusive) and for each iteration it adds the loop index to the counter variable. After the loop has been completed the execution flow continues at the completed pin, so a SetColor message is sent to the owner game object. Also note that the loop body contains a Yield statement so the loop is paused after every iteration and resumed the next frame (see the coroutines section above).
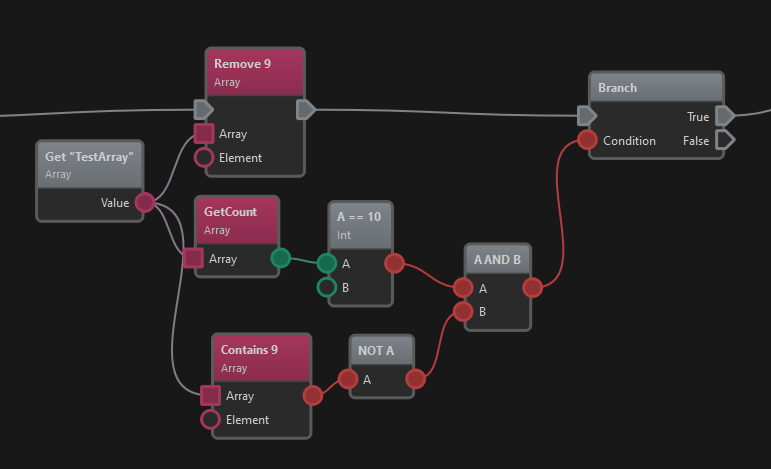
Loops are often used together with arrays. Various array operations such as PushBack, GetCount, Contains and Remove are available:
Node Types
Visual scripts provide a wide variety of node types for different operations. For detailed documentation on each node category, see the Visual Script Node Reference.
Quick Reference
The following broad categories of nodes are available:
- Event Handlers - Entry points that execute when specific messages are received
- Blackboards - Working with blackboard data
- Clock and Time - Access to global/world clocks and time operations
- Components - Component operations like GetOwner, GetWorld
- Properties - Reading and writing component properties
- Coroutines - Managing coroutines
- CVars - Reading and writing console variables
- Debug - Debug rendering
- Enums - Working with enum values
- Game Objects - Object transforms, hierarchy, and access
- World - World management operations
- Logic - Conditionals, loops, comparisons
- Math - Mathematical operations including the Expression node
- Messages - Sending messages to objects
- Physics - Physics engine functions
- Prefabs - Spawning prefabs
- Spatial - Spatial queries and quaternions
- Sound - Playing sounds
- State Machines - State machine interaction
- Strings - String operations
- Logging - Logging messages
- Variables and Type Conversion - Variable operations and type conversions