Mesh Asset Import
This chapter describes how to quickly and conveniently import mesh files and their dependencies.
General Steps
Make sure your source assets are located inside your project folder. In the asset browser navigate to that folder and set the asset browser's asset type filter to <Importable Files>.
You should then be able to see your .fbx, .gltf and .glb files.
Files that have never been imported before show an orange arrow icon as an overlay, assets that are already in use show a grey arrow icon.
Right click a file and navigate to the Import As sub-menu.
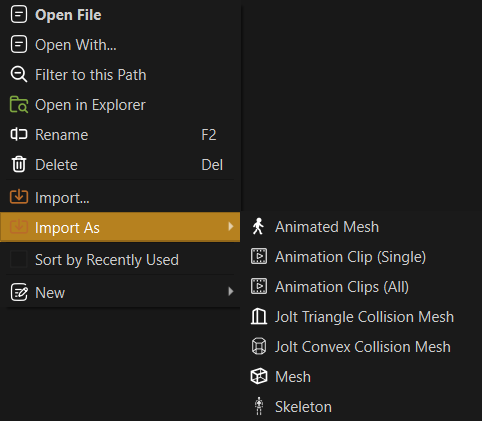
Mesh files can be imported in different ways, depending on whether they should be used as static, animated or collision meshes. Since these file types may also contain animation clips, there are also options to import only those.
Mesh Import Dialog
Select Mesh or Animated Mesh, depending on the desired usage. The following dialog will appear. For static meshes some options will be hidden, but the general concept is the same.
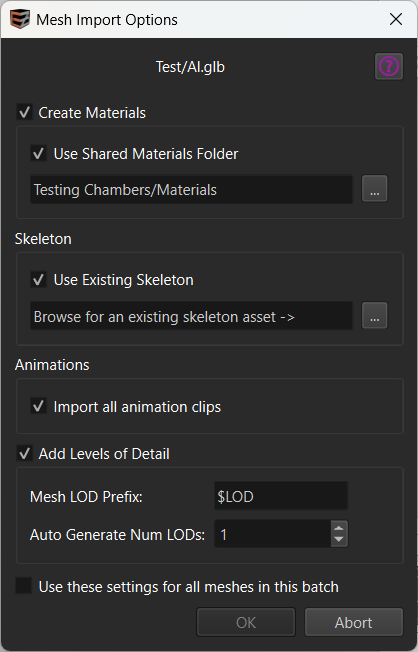
At the top, the dialog shows the name of the file to import.
The checkbox at the very bottom is relevant when you selected many meshes for import. If checked, the dialog won't be shown again and all meshes will be imported with these settings. Note that static meshes and animated meshes are treated separately, though.
Create Materials
If this option is disabled the mesh will be imported without materials, and you need to configure material references manually afterwards.
Otherwise, material assets will be created using the material description from the source asset.
If Use Shared Materials Folder is disabled, new, unique materials are created and stored in a folder next to the mesh. The folder gets a _data suffix, which means that by default the asset browser hides its contents.
If the option is enabled, you need to select a folder, where to store materials. The importer will then search the entire folder structure for existing materials with the same names as the material slots, and only create those that don't exist yet.
Important:
Sharing materials across assets requires that your team has a plan how to name material slots consistently. Make sure to decide on a naming scheme early to benefit from EZ's automatism.
New materials will be created directly in the selected folder, but you may move them to sub-folders afterwards. The log lists which new assets where created during the import step.
Skeleton
This option only shows up when importing as an animated mesh.
If Use Existing Skeleton is disabled, a new skeleton asset will be created for the animated mesh to use. You may need to open it afterwards to correct the orientation of the mesh. See the skeleton asset properties for details.
If enabled, you need to select an existing skeleton to re-use. This should be preferred, if you have multiple animated characters that share the same bone structure.
If you want to import only a skeleton, choose Import As > Skeleton.
Animations
This option only shows up when importing as an animated mesh.
Enable Import all animation clips to automatically create animation clip assets for all animations found in the mesh. If you don't want to do this now, or new animation clips get added to the source file later, you can also do only this step later by selecting Import As > Animation Clips (all).
Add Levels of Detail
If enabled the import automatically sets up additional mesh assets for level-of-detail (LOD). These can then be used with the LOD mesh component or LOD animated mesh component.
There are two possibilities for LODs:
- Self-made, low-resolution meshes.
- Automatic mesh decimation.
Option 1. is more effort, but typically yields superior results. Option 2. can be a quick and easy solution, but isn't guaranteed to give good results.
EZ supports both options.
Mesh LOD Prefix
This option is for cases where a source asset contains multiple different meshes and the meshes are named in a specific way to distinguish their use. The mesh LOD prefix is ultimately used to set the MeshIncludeTags option, such that specific meshes get imported as dedicated LODs.
For instance, name your meshes like this:
Door$LOD1_Door$LOD2_Door
Then you set the Mesh LOD Prefix to $LOD. The importer then sees that the file contains a mesh with the prefix $LOD1 and one with $LOD2 and automatically sets up two LOD meshes.
Important:
For this to work well, the main mesh also needs to exclude the
$LODmeshes. By default all meshes whose names start with$are excluded, which is why this naming scheme works well out of the box. Other schemes are possible, though.
If the mesh LOD prefix option is set to be empty, no LODs are attempted to be imported this way. However, the automatic mesh decimation (see section below) may still be used.
Auto Generate Num LODs
If this value is set to 1 or larger, the import step may add this many additional meshes as LODs and enables mesh simplification on them. However, this is only done, if no LODs were found via the Mesh LOD Prefix.
After import you should inspect the LOD meshes and check that the simplification settings produce acceptable results and that each LOD has no more than half the number of triangles than the previous one.